Racecar in Python
Important! Before you get started, make sure you have Python and pygame set up on your computer: Set up Python and pygame
In this project you’ll make a racing game in Python, using a library called pygame. You’ll drive a car round a racetrack with the arrow keys, and make it crash into the red and white kerbs.
If you’ve made the Scratch version of Racecar, lots of this will feel familiar - it’s the same game, just typed instead of built from blocks.
Don’t worry if you’ve never written Python before. Each step tells you exactly what to type, and where.
💾 Step 1: Download the starter project
Download the starter project and unzip it:
💾 Download the starter project (zip)
You’ll get a folder called racecar with three files in it:
- racecar.py - the code for the game. This is the file you’ll be changing.
- racetrack.png - the picture of the racetrack.
- car.png - the picture of the car.
Open racecar.py in Thonny, and click the green Run button (or press F5).
A window should open, showing the racetrack with the car parked on the start line. It doesn’t move yet - that’s what you’re going to code!
🔍 Step 2: Have a look around the code
Open racecar.py and have a read through it. Any line starting with a # is a comment. Python ignores comments - they’re notes for the people reading the code.
The most important part is the game loop. It starts with while running:, and everything indented underneath it happens again and again, 60 times a second, until the game ends. It’s just like a forever block in Scratch. Each time round the loop, the game does three things:
- Check for events - has the player closed the window, pressed Esc, or clicked the mouse?
- Update the game - move things around. This part is empty at the moment, which is why the car doesn’t move!
- Draw everything - draw the track, then draw the car on top of it, then show the finished picture on the screen.
Every game you’ll ever play works like this - it’s just drawing pictures really, really fast, moving things a tiny bit each time.
- Which lines of code load the pictures of the track and the car?
- What do you think
car_xandcar_yare for? - Try changing
START_ANGLEto 90, and run the game again. What happens? What about 45?
🏁 Step 3: Choose a racetrack
You can use the racetrack that comes with the starter project, or design your own at racetrack.viboko.dev. Make sure Start line is ticked, then download your track and save it in the racecar folder as racetrack.png, replacing the one that’s already there.
Now the car needs to start on your start line. Run the game, and click on the track just behind the start line. Thonny (or your terminal) will print out where you clicked, like this:
You clicked at x = 345 y = 68
Put your numbers into START_X and START_Y, near the top of racecar.py. Then set START_ANGLE so the car points over the start line. Angles are in degrees, and work like this:
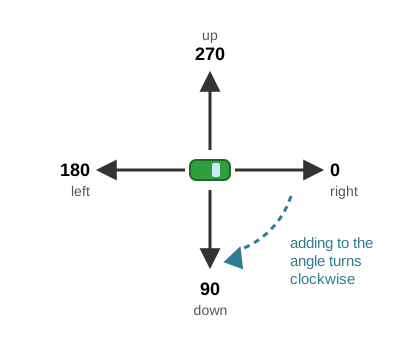
⚠️ Watch out: this isn’t quite the same as Scratch! In Scratch, 0 points up. Here, 0 points right, and 90 points down.
- Is the car in the right place? If it’s touching the kerbs, try moving it a little.
🎚️ Step 4: Make the car move
Just like in Scratch, we need a speed variable. Add this line underneath car_angle = START_ANGLE, in the part of the code that sets up the game:
car_speed = 2
Now, each time round the game loop, we need to move the car by however much its speed is. Find the comment that says # --- 2. Update the game (move things around) ---, and add the new code underneath it, so it looks like this:
    # --- 2. Update the game (move things around) ---

    # Move the car: make an arrow as long as the speed, pointing right,
    # then turn it to face the same way as the car.
    movement = pygame.Vector2(car_speed, 0).rotate(car_angle)
    car_x = car_x + movement.x
    car_y = car_y + movement.y
⚠️ Important: in Python, the spaces at the start of each line really matter! They’re how Python knows which code is inside the game loop - a bit like the way Scratch blocks fit inside a forever block. Make sure your new lines start with exactly 4 spaces, lined up with the comment above them.
Run the game. The car drives off on its own… and straight through the kerbs! Don’t worry, we’ll fix that soon.
So what’s going on? In Scratch, the move block knows which way the sprite is facing, and works out where to go for you. In Python we have to do that ourselves, so we use a Vector2, which is like an arrow:
pygame.Vector2(car_speed, 0)makes an arrow pointing right, as long as the speed..rotate(car_angle)turns the arrow so it points the same way as the car.movement.xis how far the arrow goes across, andmovement.yis how far it goes down. Adding them on tocar_xandcar_ymoves the car along the arrow.
🤓 Want to know how rotate works it out? (You don't need this to finish the game!)
If the car points to the right, it’s easy: it moves speed pixels across, and 0 down. But when it’s pointing at an angle, some of the movement is across, and some is down:
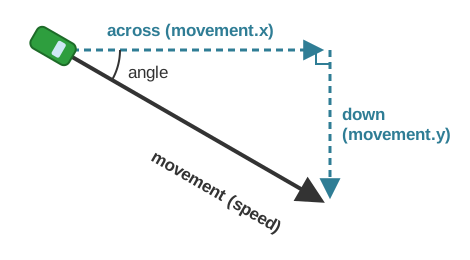
The movement, the “across” part and the “down” part make a right-angled triangle. Mathematicians worked out long ago how the sides of a triangle like this depend on the angle, and gave the answers names:
- cos (short for cosine) is how much of the movement goes across. At 0 degrees it’s 1 (all of it), and at 90 degrees it’s 0 (none of it).
- sin (short for sine) is how much of the movement goes down. At 0 degrees it’s 0, and at 90 degrees it’s 1.
So rotate is really doing this:
across = car_speed * math.cos(math.radians(car_angle))
down = car_speed * math.sin(math.radians(car_angle))
(To use these yourself, you’d need import math at the top of your code. math.radians is there because Python’s sin and cos measure angles in radians instead of degrees. A full turn is about 6.28 radians, instead of 360 degrees.)
You’ll learn about sin and cos in maths at school, where it’s called trigonometry. Now you know one thing it’s useful for - making games!
- What happens if you change the speed to 5? What about -2?
🚀 Step 5: Make the car speed up
Now let’s control the speed with the arrow keys. First, change the speed you added in the last step to 0, so the car starts off parked:
car_speed = 0
Next, add this code underneath # --- 2. Update the game (move things around) ---, above the code that moves the car:
    # Which keys are being held down right now?
    keys = pygame.key.get_pressed()

    # Up arrow: speed up, but not past the top speed.
    if keys[pygame.K_UP]:
        if car_speed < 3:
            car_speed = car_speed + 0.1
pygame.key.get_pressed() checks which keys are being held down right now, a bit like the key pressed? block in Scratch. Then if the up arrow is held, we add 0.1 to the speed - but only if it’s less than 3, so that 3 is the top speed.
Notice the code inside each if is indented by another 4 spaces. That’s how Python knows which code belongs inside the if.
Why does it have to go above the code that moves the car? Python runs your code from top to bottom, so it’s best to work out the speed first, then move the car using the new speed.
- What happens if you change the top speed to 10? Is the car still easy to drive?
- What happens if you change 0.1 to 1?
🐢 Step 6: Make the car slow down and reverse
Let’s use the down arrow to brake. If you keep holding it, the car will start to reverse. Add this underneath the code for the up arrow:
    # Down arrow: slow down, then reverse.
    if keys[pygame.K_DOWN]:
        if car_speed > -1.5:
            car_speed = car_speed - 0.1
When the speed goes below 0, the movement arrow points backwards, so the car reverses. This lets the car reverse at a speed of up to 1.5.
- Real cars slow down by themselves when you take your foot off the pedal. Can you make the car slow down when neither the up arrow nor the down arrow is held? Hint:
if not keys[pygame.K_UP] and not keys[pygame.K_DOWN]:, and try multiplying the speed by 0.98 each time round the loop.
↩️ Step 7: Make the car steer
Next, let’s use the left and right arrows to steer. Add this underneath the code for the down arrow, but still above the code that moves the car:
    # Left and right arrows: steer.
    if keys[pygame.K_LEFT]:
        car_angle = car_angle - 3
    if keys[pygame.K_RIGHT]:
        car_angle = car_angle + 3
Look back at the picture of angles in Step 3. Adding to the angle turns the car clockwise, which is to the right, and taking away turns it to the left.
You don’t need to change the drawing code at all - it already turns the car picture to match car_angle. And because the movement arrow is turned by car_angle too, the car always drives the way it’s facing.
Try driving around the track!
- What happens if you turn by more or fewer degrees?
- At the moment, the car can spin round on the spot when it’s not moving, which real cars can’t do. Can you make it only steer when
car_speedisn’t 0?
🔴 Step 8: Find the kerbs
The car can still drive straight through the kerbs! To stop that, the game first needs to know where the kerbs are.
We’ll use a mask for this. A mask is like a stencil of a picture: for each pixel, it remembers whether the pixel is part of something (yes or no). We’ll make two masks, one for all the red pixels on the track, and one for all the white pixels.
Add this underneath car_speed = 0, in the part of the code that sets up the game:
# Find the kerbs: every red pixel, and every white pixel, on the track.
red_kerbs = pygame.mask.from_threshold(track_image, (255, 0, 0), (60, 60, 60))
white_kerbs = pygame.mask.from_threshold(track_image, (255, 255, 255), (60, 60, 60))
(255, 0, 0) is the colour red, as amounts of red, green and blue, from 0 to 255. (255, 255, 255) is white - all three colours, mixed at full brightness. The last part, (60, 60, 60), means “near enough is good enough”, so pixels that are nearly red or nearly white still count.
This only needs to happen once, when the game starts, because the kerbs never move.
Let’s check it’s worked! Find the line in the drawing part that draws the track, screen.blit(track_image, (0, 0)), and change it to this:
screen.blit(red_kerbs.to_surface(), (0, 0))
Run the game, and you’ll see what the computer sees: the red kerbs in white, and everything else in black. When you’ve finished looking, change the line back to draw the track again.
- Can you change it to show the white kerbs instead?
💥 Step 9: Crash into the kerbs
Now we can check whether the car has hit a kerb. Each time round the loop, we’ll move the car, and then check whether any of its pixels are on top of any kerb pixels. If they are, we put the car back where it was before it moved, and stop it.
To do that, we need to remember where the car was before it moved. Add this underneath # --- 2. Update the game (move things around) ---, above all of the other code you’ve added there:
    # Remember where the car is, in case it crashes.
    old_x = car_x
    old_y = car_y
    old_angle = car_angle
Then add this underneath the code that moves the car, at the end of the update part:
    # Has the car hit a kerb?
    turned_car = pygame.transform.rotate(car_image, -car_angle)
    car_rect = turned_car.get_rect(center=(round(car_x), round(car_y)))
    car_mask = pygame.mask.from_surface(turned_car)
    hit_red = red_kerbs.overlap(car_mask, car_rect.topleft)
    hit_white = white_kerbs.overlap(car_mask, car_rect.topleft)
    if hit_red or hit_white:
        # Crash! Put the car back where it was, and stop it.
        car_x = old_x
        car_y = old_y
        car_angle = old_angle
        car_speed = 0
The first two lines might look familiar - they’re the same as the drawing code, to turn the car picture and work out where it goes. Then:
pygame.mask.from_surface(turned_car)makes a mask of the car, so we know which pixels are car and which are the see-through background around it.overlaplays the car’s mask on top of the kerb mask, in the car’s position, and checks whether any pixels are in both.- If the car has hit a red or a white kerb, it’s a crash!
Why do we put the angle back too? If you steer into a kerb, it’s the turning that makes the car hit it. If we only put the car’s x and y back, it would still be turned into the kerb, and get stuck there forever.
Now try to drive through the kerbs - you can’t!
😕 Stuck? Here's what the update part of your game loop should look like now
    # --- 2. Update the game (move things around) ---

    # Remember where the car is, in case it crashes.
    old_x = car_x
    old_y = car_y
    old_angle = car_angle

    # Which keys are being held down right now?
    keys = pygame.key.get_pressed()

    # Up arrow: speed up, but not past the top speed.
    if keys[pygame.K_UP]:
        if car_speed < 3:
            car_speed = car_speed + 0.1

    # Down arrow: slow down, then reverse.
    if keys[pygame.K_DOWN]:
        if car_speed > -1.5:
            car_speed = car_speed - 0.1

    # Left and right arrows: steer.
    if keys[pygame.K_LEFT]:
        car_angle = car_angle - 3
    if keys[pygame.K_RIGHT]:
        car_angle = car_angle + 3

    # Move the car: make an arrow as long as the speed, pointing right,
    # then turn it to face the same way as the car.
    movement = pygame.Vector2(car_speed, 0).rotate(car_angle)
    car_x = car_x + movement.x
    car_y = car_y + movement.y

    # Has the car hit a kerb?
    turned_car = pygame.transform.rotate(car_image, -car_angle)
    car_rect = turned_car.get_rect(center=(round(car_x), round(car_y)))
    car_mask = pygame.mask.from_surface(turned_car)
    hit_red = red_kerbs.overlap(car_mask, car_rect.topleft)
    hit_white = white_kerbs.overlap(car_mask, car_rect.topleft)
    if hit_red or hit_white:
        # Crash! Put the car back where it was, and stop it.
        car_x = old_x
        car_y = old_y
        car_angle = old_angle
        car_speed = 0
- Can you make the car bounce backwards a little bit when it crashes, instead of just stopping? Hint: what happens if you set the speed to
-car_speed / 2instead of 0? - Can you play a crash sound? Look up
pygame.mixer.Soundto find out how.
🤔 Challenges
- Can you make the car steer more slowly when it’s going slowly, like a real car?
- Can you add a second car, controlled with the W, A, S and D keys, so two players can race each other?
- Can you add an oil slick to the track that makes the car spin round when it drives over it?
- Can you add a lap counter and time how long each lap takes?
- What else can you think of?