Racecar
Drive a racecar around a track using the arrow keys! You’ll make the car speed up and slow down, crash into the edges of the track, and count your laps.
🔄 Step 1: Remix the starter project
Open the starter project at scratch.mit.edu/projects/1389467381 and click Remix to make your own copy. Don’t forget to give it a new name!
Before you start coding, have a look around the project:
- What sprites are there?
- What costumes do the sprites have?
- Is there any code already?
🏁 Step 2: Choose a racetrack
You can use the racetrack that comes with the starter project, or design your own at racetrack.viboko.dev and upload it as a new backdrop.
🎚️ Step 3: Add a speed variable
Click Make a Variable and call it speed.
When the game starts, we want the car to be parked on the start line, facing the right way, with its speed set to 0. Then a forever loop keeps the car moving by however much its speed is. Add this code to the car sprite:
when green flag clicked
set [speed v] to (0)
go to x: (-66) y: (147)
point in direction (90)
forever
    move (speed) steps
end
The speed is always 0 for now, so don’t worry that the car isn’t moving yet - that’s next!
- If you’ve made your own racetrack, can you change the x and y numbers so that the car starts on your start line?
🚀 Step 4: Make the car speed up
When the up arrow is pressed, we want the car to go a little bit faster - but not forever, or it would get impossibly fast! Put this if block inside the forever loop:
if <key (up arrow v) pressed?> then
    if <(speed) < (5)> then
        change [speed v] by (1)
    end
end
This gives the car a top speed of 5.
- What happens if you change the top speed to 10? Is the car still easy to drive?
🐢 Step 5: Make the car slow down and reverse
Now let’s use the down arrow to brake. If you keep holding it down, the car will start to reverse. Put this inside the forever loop, underneath the last bit of code:
if <key (down arrow v) pressed?> then
    if <(speed) > (-3)> then
        change [speed v] by (-1)
    end
end
This means the car can reverse at a speed of up to 3.
- Real cars slow down by themselves when you take your foot off the pedal. Can you make the speed gradually go back to 0 when no keys are pressed?
↩️ Step 6: Make the car steer
Next, let’s use the left and right arrows to steer. Put this inside the forever loop too:
if <key (left arrow v) pressed?> then
    turn left (5) degrees
end
if <key (right arrow v) pressed?> then
    turn right (5) degrees
end
Try driving around the track!
- What happens if you turn by more or fewer degrees?
💥 Step 7: Crash into the edges of the track
At the moment, the car can drive straight over the grass! Let’s make it stop when it hits the red and white edges of the track.
If you look closely at the car’s costume (try setting the car’s size to 100), you’ll see a purple bumper on the front. We can use this to check whether the front of the car has hit the edge.
Put this inside the forever loop:
if <<color (#8f5bff) is touching (#ffffff)?> or <color (#8f5bff) is touching (#ff0000)?>> then
    set [speed v] to (0)
end
- Can you make the car bounce backwards a little bit when it crashes, instead of just stopping?
- Can you play a crash sound?
🔢 Step 8: Count the laps
Make another variable called laps. Set it to 0 when the game starts, by adding this to your when green flag clicked script, before the forever loop:
set [laps v] to (0)
Then, inside the forever loop, check whether the car’s bumper is touching the yellow squares on the finish line:
if <color (#8f5bff) is touching (#eec200)?> then
    change [laps v] by (1)
end
Give it a test. Uh-oh - the lap counter goes up far too quickly, and you can cheat by reversing backwards and forwards over the finish line! Let’s fix that with a checkpoint…
🚩 Step 9: Add a checkpoint
Paint a new sprite called checkpoint. It only needs to be a coloured rectangle. Drag it about halfway around the track, and make it big enough to stretch across the whole track, like this:
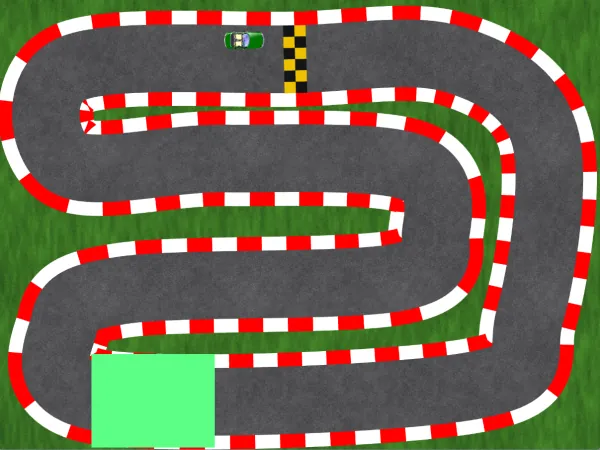
We don’t want players to see the checkpoint, so add this code to the checkpoint sprite to make it invisible:
when green flag clicked
set [ghost v] effect to (100)
⚠️ Important: don’t use the hide block! Scratch can’t tell when something is touching a hidden sprite, so the checkpoint would stop working. The ghost effect makes it invisible, but it’s still there.
✅ Step 10: Only count a lap after the checkpoint
Make one more variable called checkpoint, and set it to 0 when the game starts, just like you did with laps:
set [checkpoint v] to (0)
The idea is that checkpoint becomes 1 when the car drives through the checkpoint. A lap only counts if the car crosses the finish line after going through the checkpoint. Then checkpoint goes back to 0, ready for the next lap.
Go back to the car sprite and change the code you added in Step 8 so it looks like this:
if <<color (#8f5bff) is touching (#eec200)?> and <(checkpoint) = (1)>> then
    set [checkpoint v] to (0)
    change [laps v] by (1)
end
if <touching (checkpoint v)?> then
    set [checkpoint v] to (1)
end
Now try to cheat - you can’t!
- Can you play a sound or show a message each time a lap is completed?
🤔 Challenges
- Can you add a timer, so players can try to beat their fastest lap?
- Can you make the game end after 3 laps, and show a “Finished!” message?
- Can you add an oil slick to the track that makes the car spin round when it drives over it?
- Can you add a second car, controlled with the W, A, S and D keys, so two players can race each other?
- Can you add an engine sound that gets higher as the car goes faster?
- What else can you think of?